Overview
The Application Configuration module in Regology allows administrators to customize how Regology functions within their organization. This guide provides a comprehensive walkthrough of the available configuration options.
Email Notifications
Configure email notifications to stay informed about compliance updates and system alerts.
Steps to Configure Email Notifications:
-
Navigate to Application Configuration > Email Notifications.
-
The Manage Your Email Notifications page appears.
-
Toggle the switch adjacent to each email type to enable the desired email notifications.
-
Set the frequency of emails for each type from the available options:
-
Monthly
-
Weekly
-
Daily
-
-
Enable or disable specific categories within each email type.
-
Click Send Test Email at the top of the page to test email functionality.
Search Results
Customize search result settings to optimize user experience and data retrieval.
Steps to Configure Search Results:
-
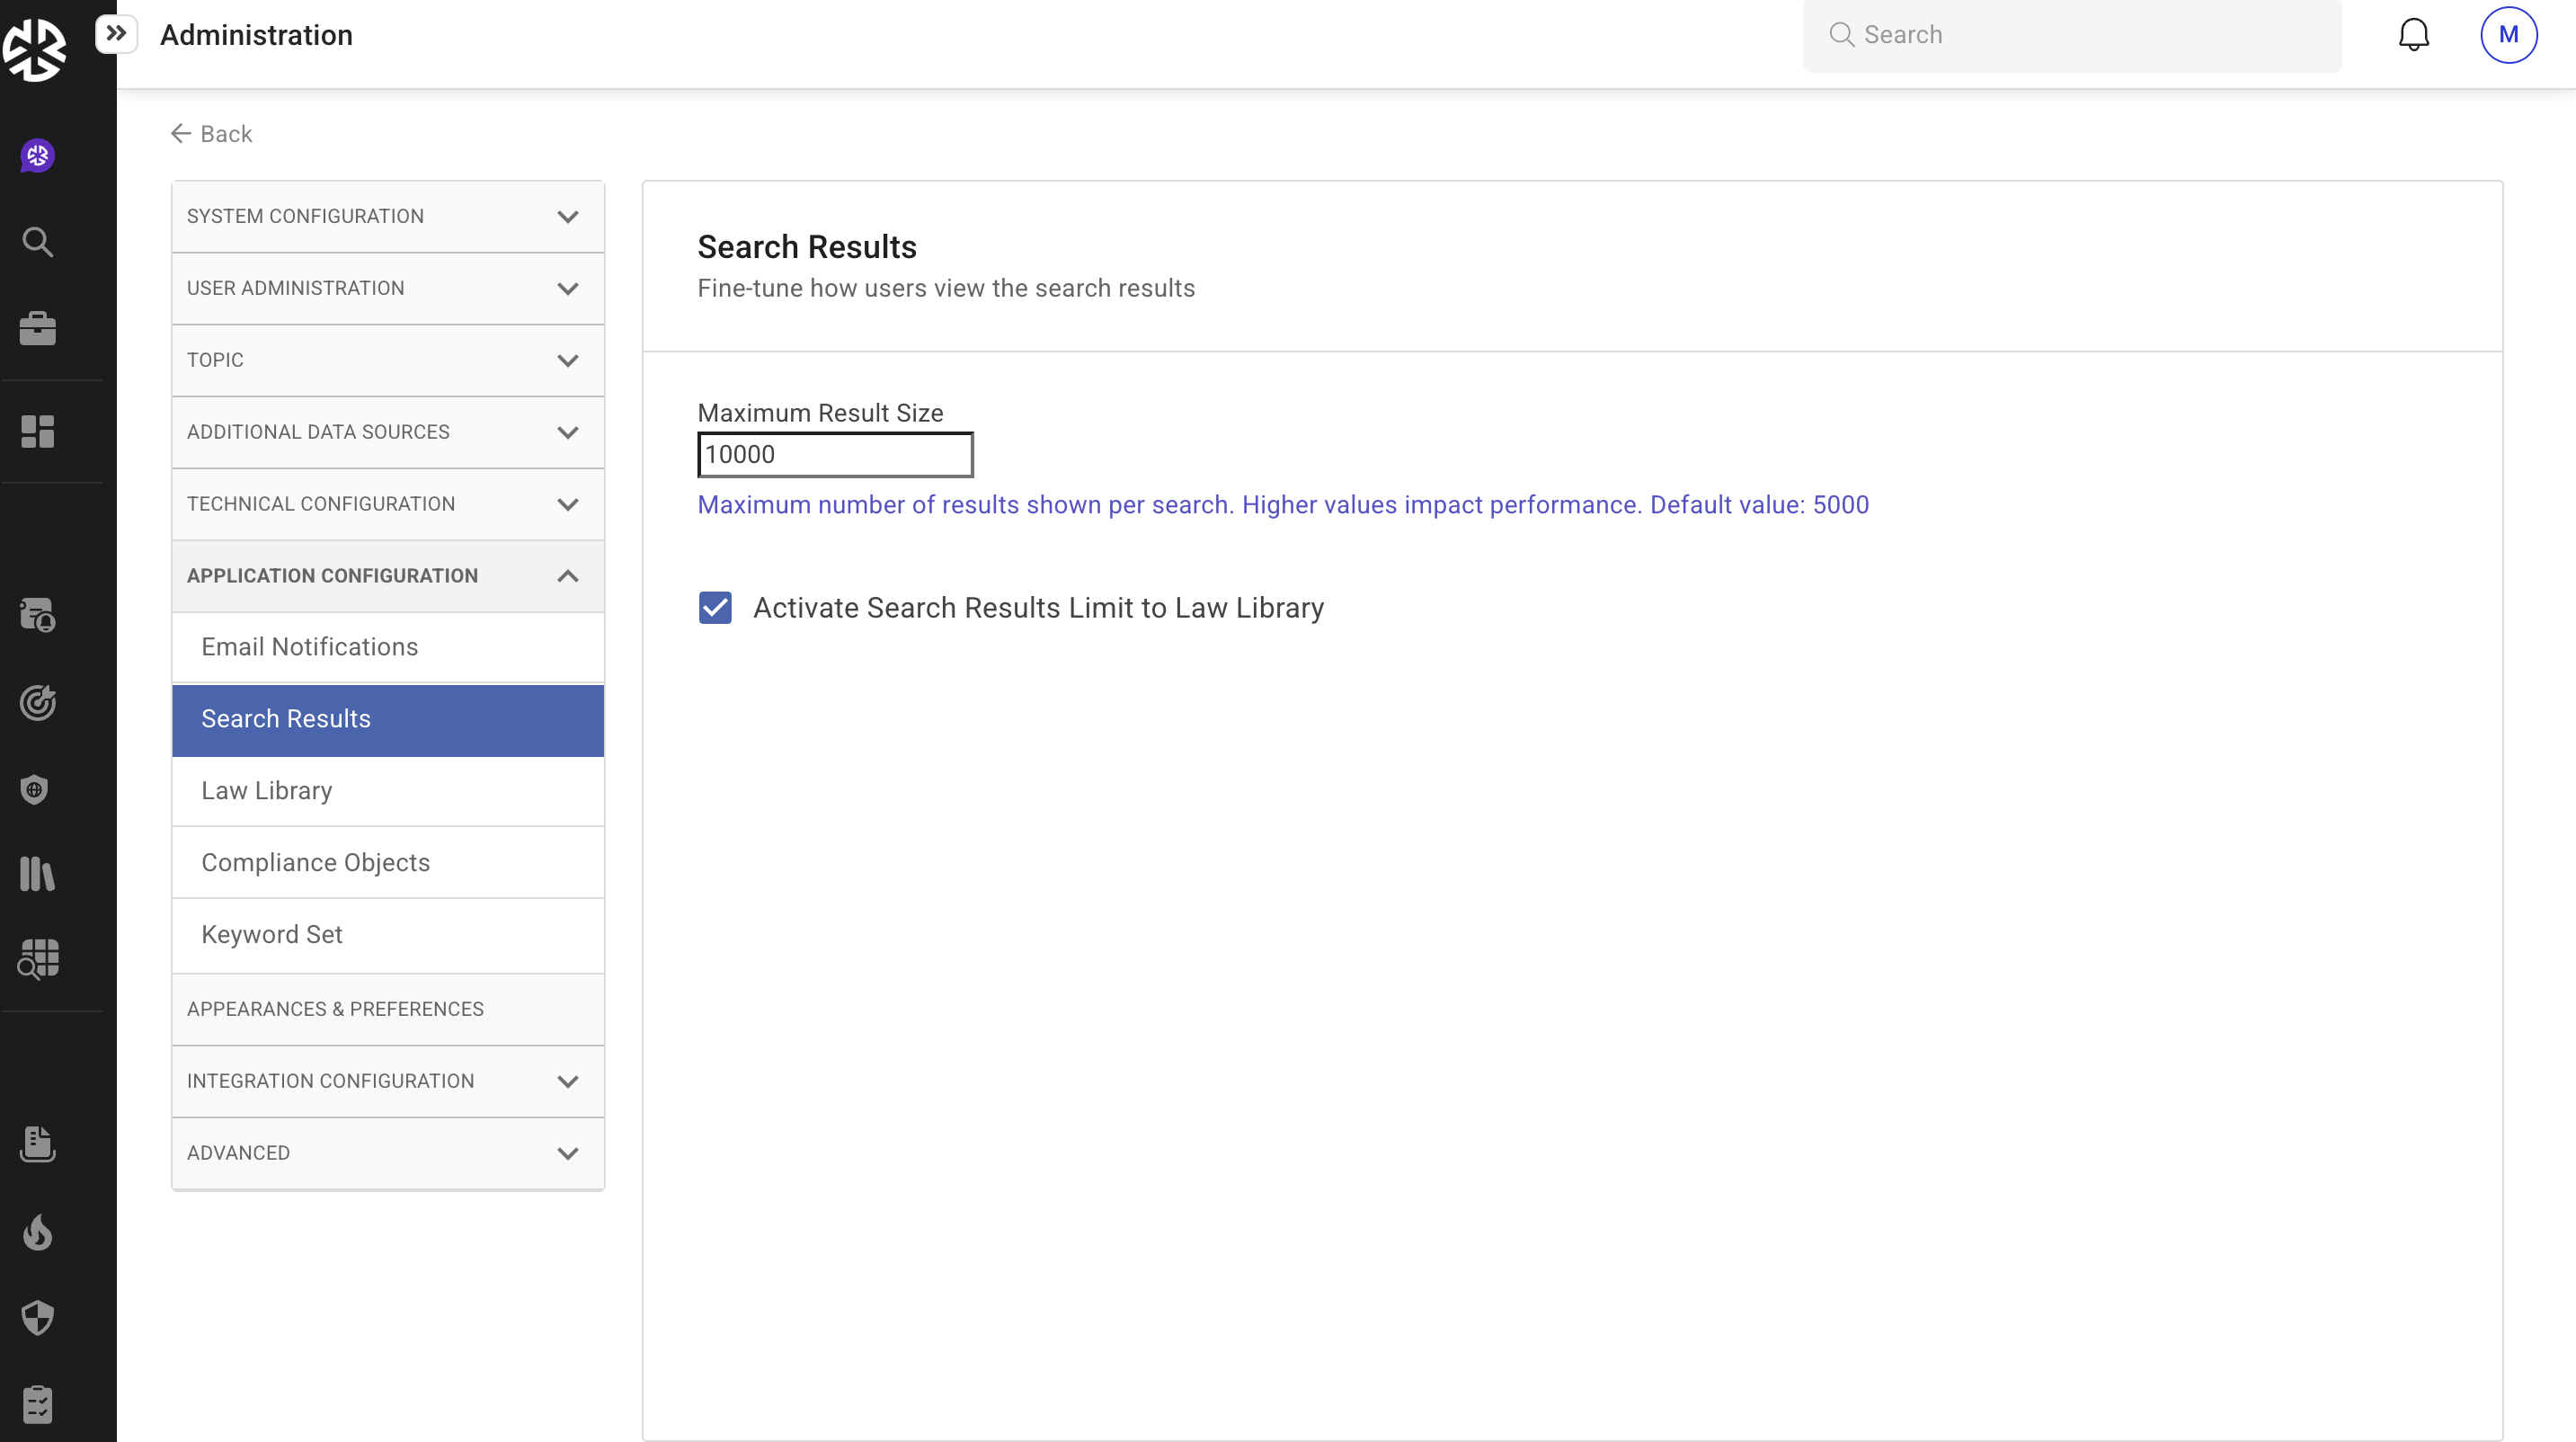
Navigate to Application Configuration > Search Results.
-
The Search Results page appears.
-
Use the Maximum Result Size field to set the maximum number of search results displayed per query.
-
Enable the Activate Search Results Limit to Law Library checkbox to restrict search results to the Law Library.
-
The changes are saved automatically.
Law Library
Adjust Law Library settings to control how legal documents are displayed and accessed.
Steps to Configure Law Library:
-
Navigate to Application Configuration > Law Library.
-
Use the Select Master Data field to specify the default data type displayed on the Law Library page.
-
Enable or disable features by selecting the respective checkboxes:
a. Activate Custom Data Upload: Enables users to upload their own legal or compliance content (e.g., internal policies, third-party legal documents) into the Law Library, alongside official regulatory sources.
How it works in the Law Library:
-
Once enabled, an ‘Add’ button appears at the top-right corner of the Law Library page.
-
Users can click this option to add documents in supported formats (commonly PDF, doc, docx, and txt).
-
During upload, metadata such as jurisdiction, topic, and effective date can be assigned.
-
The uploaded content becomes part of the Law Library, searchable and mappable to compliance objects just like official authority documents.
b. Activate Export from Law Library: Allows users to export content (laws, regulations, content.
requirements, mapped items) from the Law Library into an Excel document for offline analysis or reporting.
Where to Export in the Law Library:
-
Once enabled, the Export Law Library option appears under the three-dot menu (⋮) dropdown in the top-right corner of the Law Library.
-
Users can click this option to choose the export format and download the selected.
c. Activate Bill History: Displays the legislative history of a bill, including past versions, amendments, and status updates, helping users track how a regulation evolved over time. Once enabled, the bill’s history can be viewed by clicking the View Document button, which displays its progression.

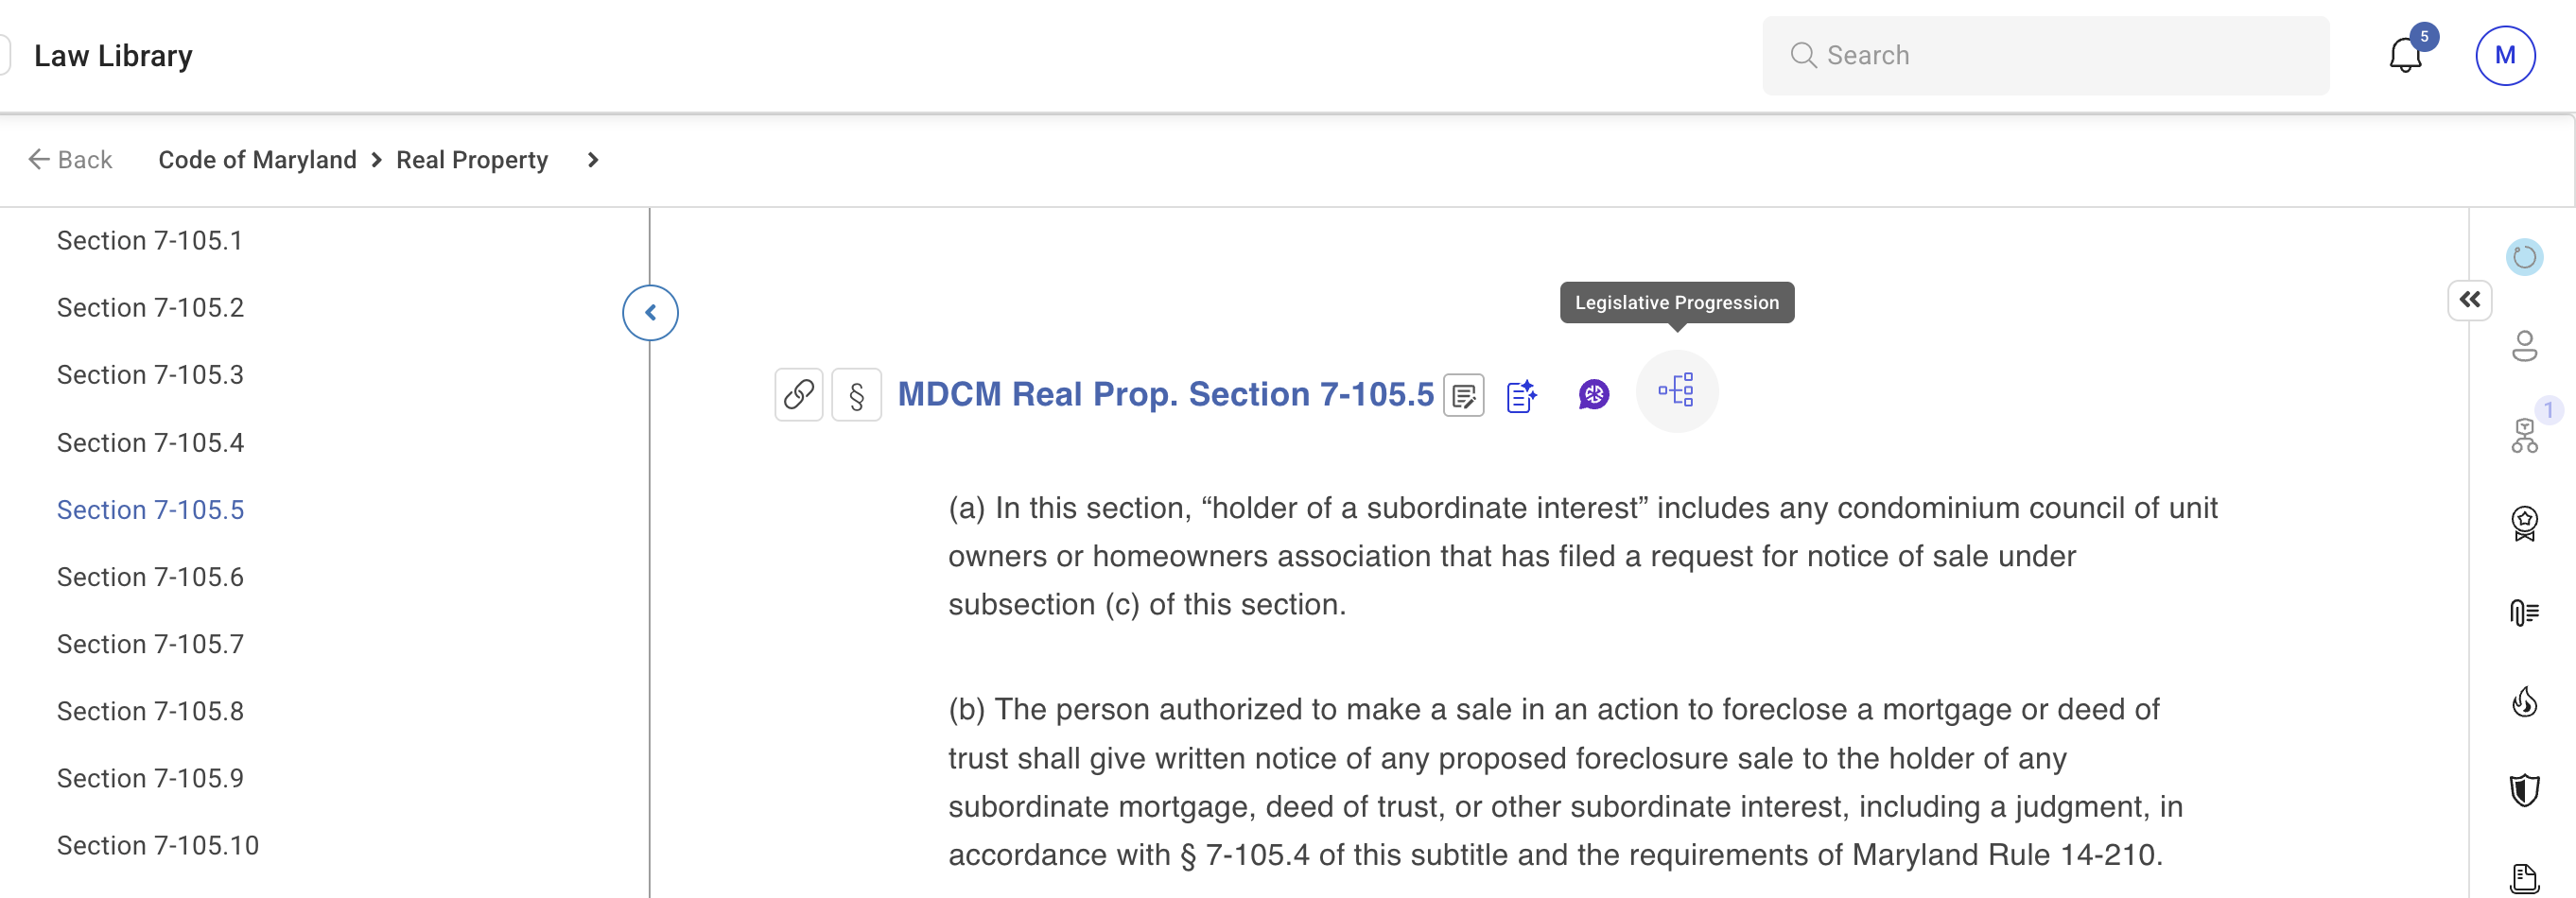
d. Activate Legislative Progression: Provides a visual map of how an authoritative document is connected to related bills, regulations, and laws. Once activated, the Legislative Progression icon appears within the authoritative document in the Law Library, enabling users to view nodes, connections, and key details for each linked document.
e. Enable Translation: Allows toggling between translated and original content, useful for multinational organizations handling non-English regulations.
f. Activate Law Library Review/Approval Workflow: Enables a structured review and approval process for changes in the Law Library—such as adding new content, mapping, or editing, ensuring all updates are vetted before being published for organizational use.
g. Activate Law Library Full Rebuild: Allows administrators to trigger a full rebuild of the Law Library index and mappings. This is useful after large content updates, data uploads, or system changes to ensure law library is refreshed and consistent.
Compliance Objects
Customize compliance object settings, including side-panel features and status management.
Steps to Configure Compliance Objects:
-
Navigate to Application Configuration > Compliance Objects.
-
The Compliance Objects page appears.
-
Select a compliance object to configure from the following tabs:
-
Authoritative Documents
-
Requirements
-
Risk
-
Control
-
Task
-
-
Enable desired side-panel features under Activate Side Panel Features.
Adding a Status:
-
Click Add next to the Manage Status Names section.
-
Enter a unique ID, choose a Color, and provide a Name.
-
Configure additional settings:
-
Active: Enables the status for selection.
-
Exclude: Removes authoritative documents with this status from the Law Library and disables related alerts and notifications.
-
Mute Alert: Retains authoritative documents with this status in the Law Library but disables alerts and notifications.
-
-
Click Done to save changes.
Editing a Status:
-
Click the Ellipsis next to the status to edit.
-
Select Edit.
-
Modify the Status Name, Color, and other settings as required.
-
Click Done to save changes.
Deleting a Status:
-
Click the Ellipsis next to the status to delete.
-
Select Delete.
Keyword Set
Keywords are utilized across routing rules, refinement rules, ad hoc research, and additional data sources (feeds) to enhance search functionality. Manage keyword sets effectively to ensure efficient and accurate search results.
Steps to Configure Keyword Sets:
-
Navigate to Application Configuration > Keyword Set.
-
Select a tab to manage keyword sets:
-
Regology Delivered
-
Company Owned
-

Creating a Keyword Set:
-
Click the Active Keyword Sets tab.
-
Click Add.
-
Enter a Keyword Set Name.
-
Use the Include Keywords and Exclude Keywords fields to define keyword lists.
-
Click Done to create the keyword set.
Editing a Keyword Set:
-
Click the Active Keyword Sets tab.
-
Click the Ellipsis next to the keyword set to edit.
-
Select Edit.
-
Modify the Keyword Set Name, Include Keywords, and Exclude Keywords fields.
-
Click Done to save changes.
Deleting a Keyword Set:
-
Click the Company Owned tab.
-
Click the Ellipsis next to the keyword set to delete.
-
Select Delete.