Overview
The User Administration section in Regology enables administrators to efficiently manage users, assign roles, configure access permissions, and organize groups.
Users
Accessing the Users Section
-
Go to Administration.
-
Under User Administration, click Users.
-
The Manage Users dashboard appears, displaying:
-
Total Users
-
Unlocked vs Locked Users
-
Users by Role
-
Users by Group
-
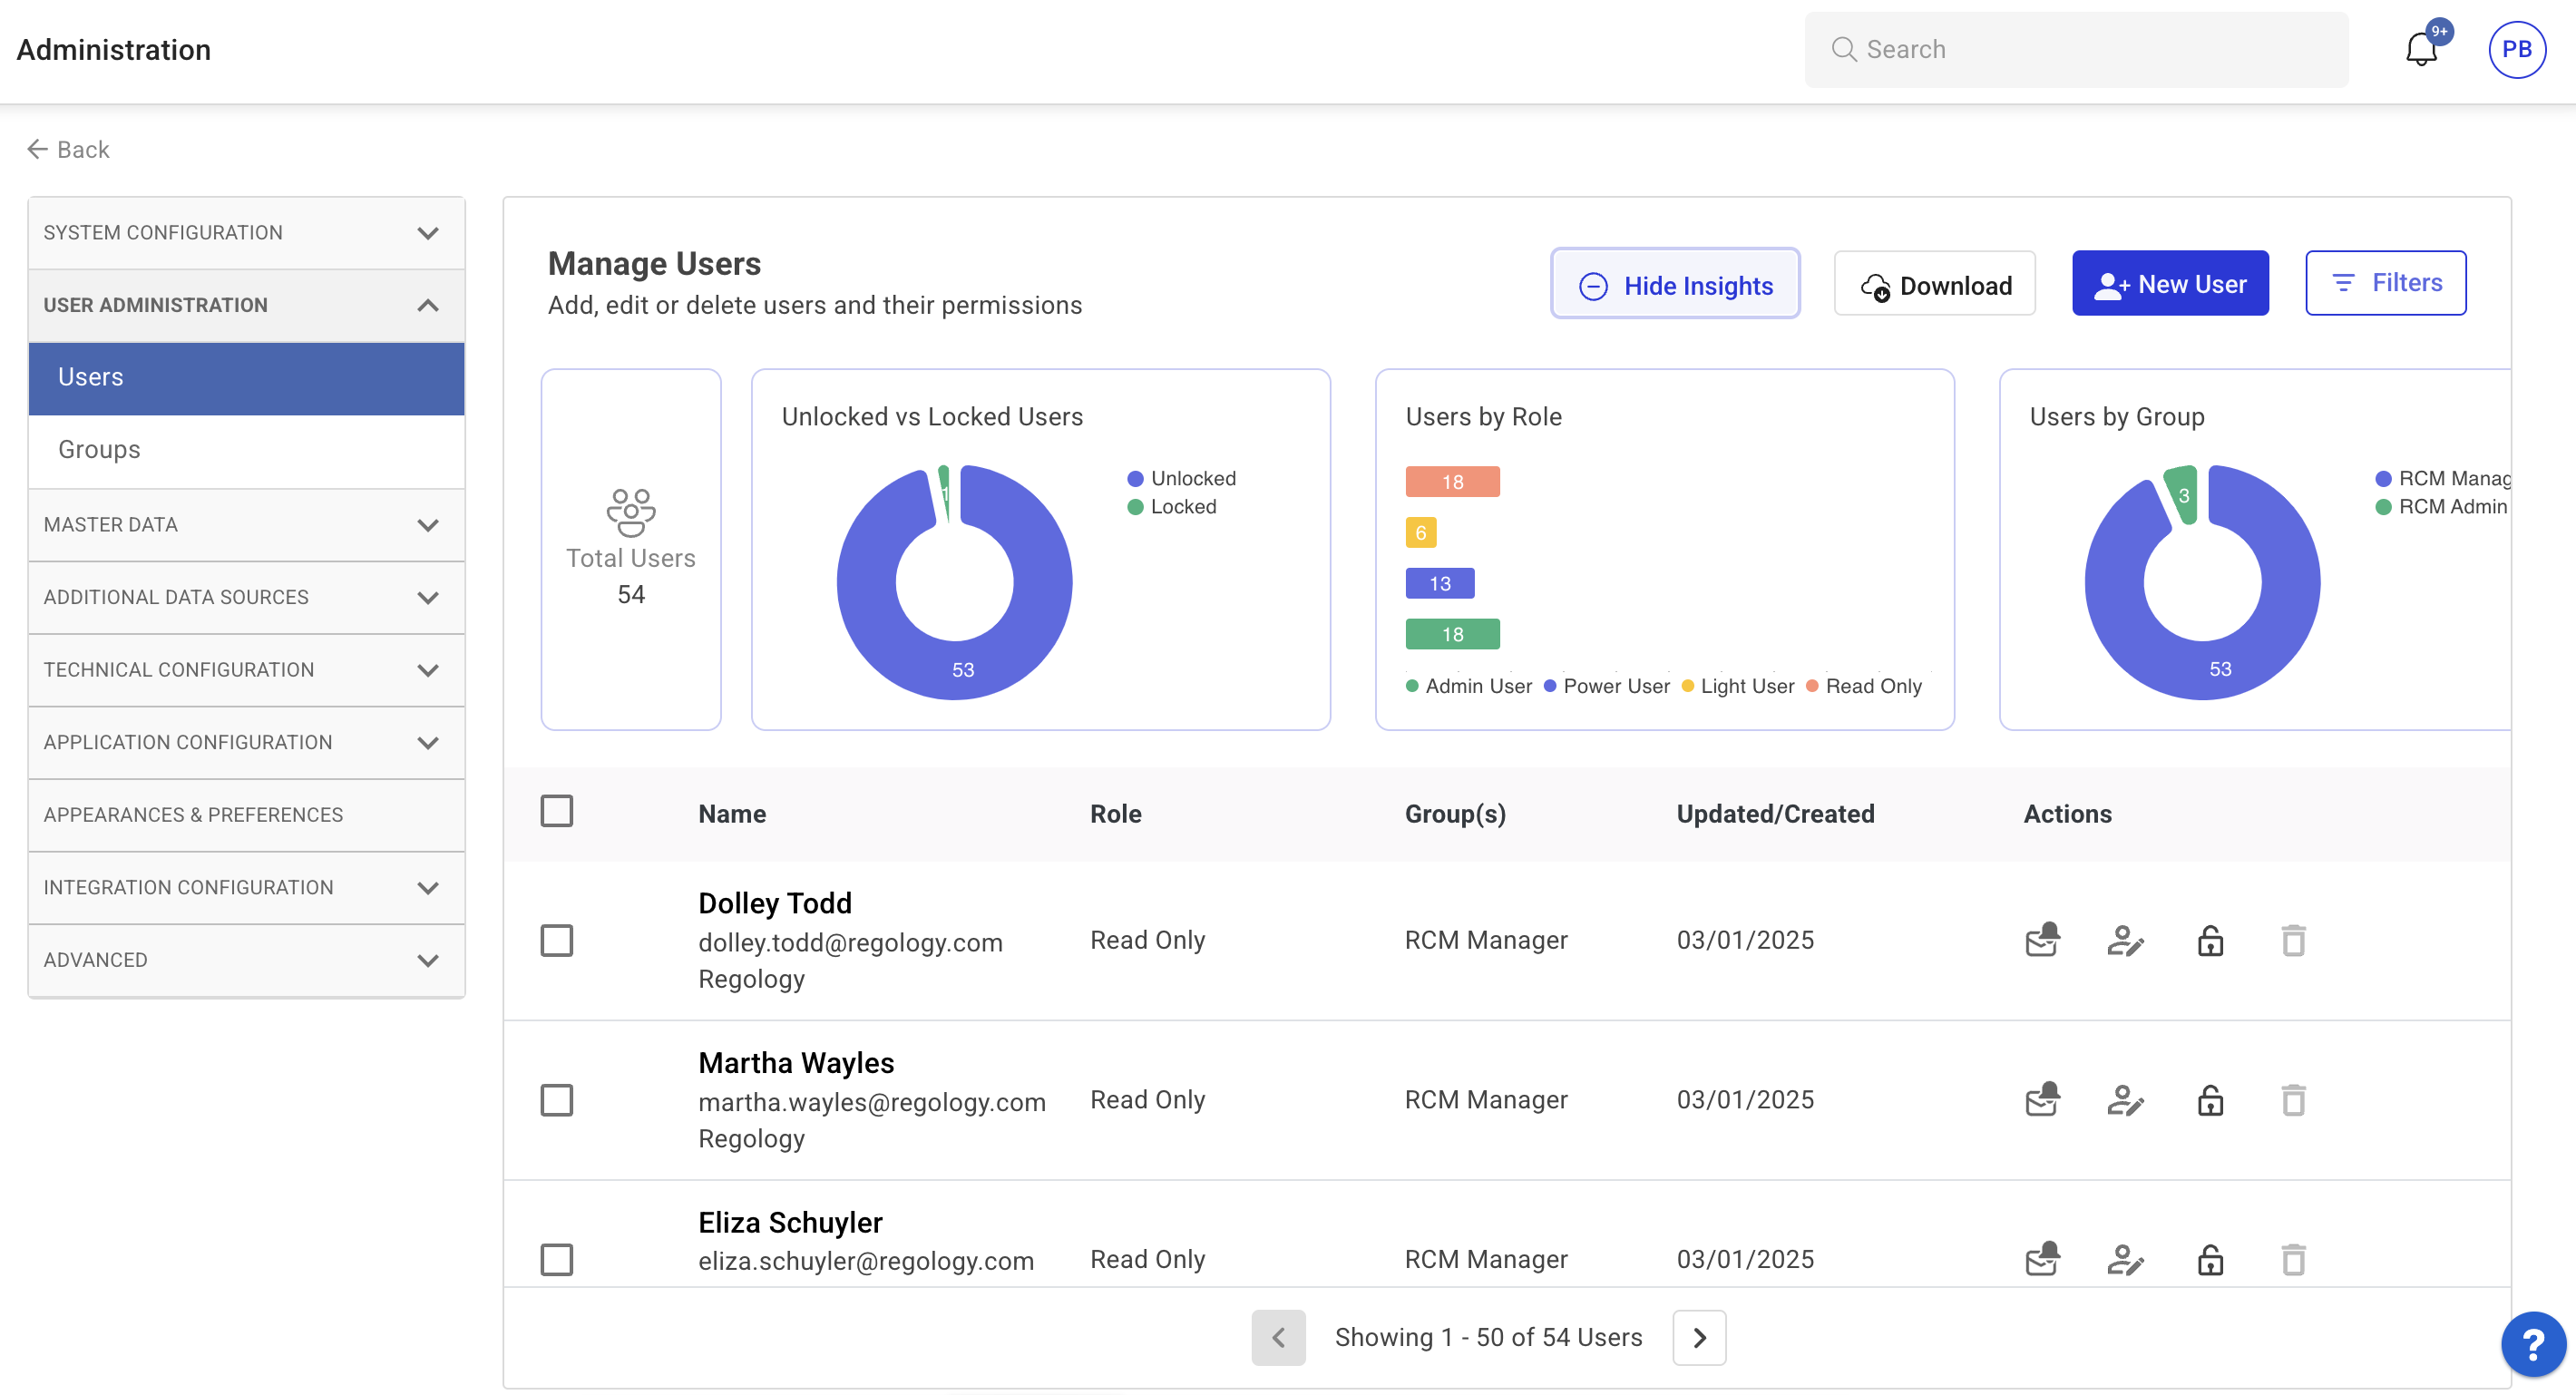
Perform user-related actions such as adding, editing, locking, unlocking, or deleting users.
Insights Overview
The Insights panel provides a quick visual summary of user data across the platform.
-
Total Users: Displays the total number of registered users.
-
Unlocked vs Locked Users: Pie chart showing how many accounts are active (unlocked) versus inactive (locked).
-
Users by Role: Breakdown of users by assigned role (e.g., Admin, Power User).
-
Users by Group: Categorization of users based on group membership.
You can toggle visibility using the Show/Hide Insights button.
Managing Users
Adding a New User
-
Click New User.
-
Enter the user’s Name and Email ID.
-
Select the Identity Provider for authentication.
-
Assign a Role to the user.
-
Allocate a Group to the user.
-
(Optional) Enable Email Instructions to User to send login instructions.
-
Click Save Changes to confirm or Cancel to discard changes.
-
Use the Download button to export user data if needed.
Editing User Details

-
Click the Edit User icon next to the user’s name.
-
Update the required details in the Edit User modal.
-
Click Save Changes to apply updates.
Locking and Unlocking Users
-
Click the Lock/Unlock icon for the user.
-
Confirm the action in the warning message.
-
Locked users cannot access Regology until they are unlocked.
-
Locking a user does not delete their data.
-
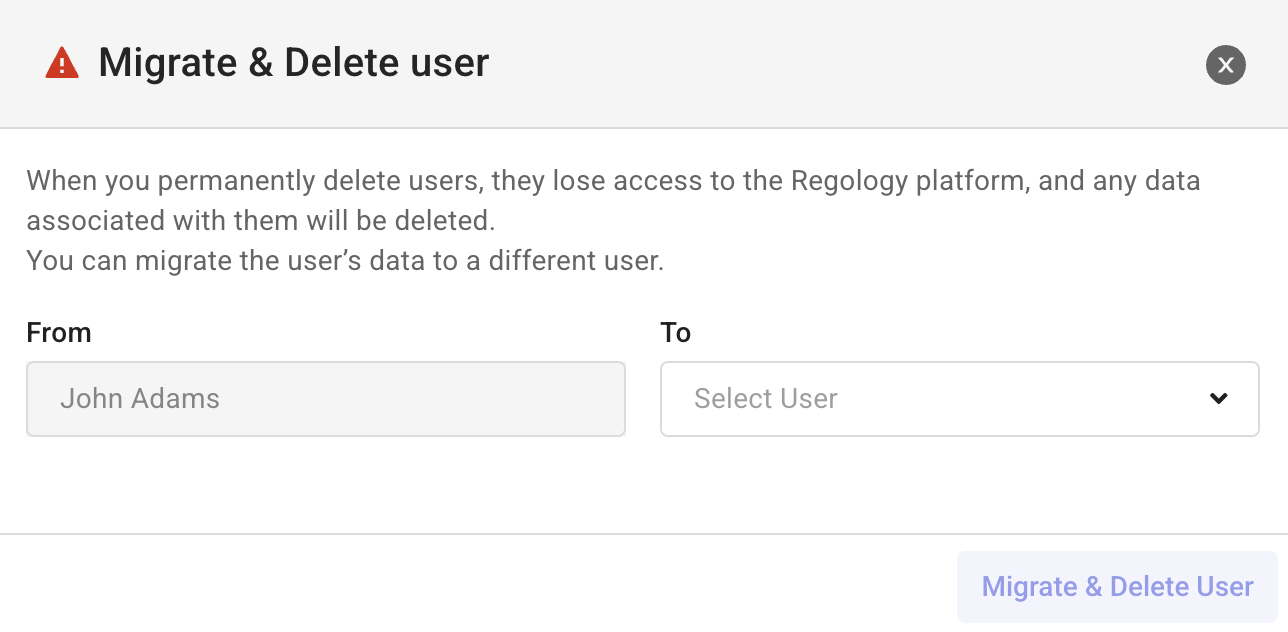
Deleting Users
-
Click the Delete icon next to the user’s name.
-
In the Migrate & Delete User modal, select a user to transfer associated data.
-
Click Migrate & Delete User to complete the deletion process.
Managing Email Notifications
To configure email notification settings:

-
Click the Email Notifications icon.
-
Adjust the Status, Type, and Date settings as needed.
Filtering Users
To filter users based on specific criteria:
-
Click the Filter menu at the top-right corner.
-
Use the Filters side panel to filter by:
-
Name: Search for specific users or groups.
-
Role: Filter users by role (e.g., Light User, Power User) to refine the list.
-
Account Status: Narrow results by account status (e.g., locked, unlocked).
-
Roles and Permissions
Regology delivers predefined roles with specific permissions to control access and actions within the platform.
-
Admin User - Full control over all features, including administrative and user management.
-
Power User - Extensive access, with permissions to modify most content but no administrative rights.
-
Light User - Can view and edit certain content but does not have full edit rights.
-
Read-Only User - Restricted to viewing content without editing capabilities.
|
Module |
Permission |
Admin User |
Power User |
Light User |
Read Only |
|
Regulatory Change Management |
Law Library |
Full Access |
Full Access |
Comments Only |
Read Only |
|
Regulatory Change Alerts |
Full Access |
Full Access |
Edit Own |
No Access |
|
|
Impact Assessments |
Full Access |
Full Access |
Edit Own |
No Access |
|
|
Compliance Management |
Compliance Objects (Requirements, Risks, Controls, Policies) |
Full Access |
Full Access |
Edit Own |
Read Only |
|
Evidence & Document Upload |
Full Access |
Full Access |
Edit Own |
No Access |
|
|
Tasks |
Full Access |
Full Access |
Edit Own |
Read Only |
|
|
Regulatory Research |
GenAI Queries - Reggi |
Full Access |
Full Access |
Full Access |
No Access |
|
GenAI Agentic Workflows - Reggi |
Full Access |
Full Access |
No Access |
No Access |
|
|
Advanced Search |
Full Access |
Full Access |
Edit Own |
No Access |
|
|
Ad Hoc Research |
Full Access |
Full Access |
Edit Own |
No Access |
|
|
Miscellaneous |
Reports |
Full Access |
Full Access |
Read Only |
No Access |
|
Administration & User Management |
Full Access |
No Access |
No Access |
No Access |
|
|
Saved Views |
Full Access |
Edit Own |
Edit Own |
No Access |
Legend
-
Full Access - User can view, create, edit, and delete content.
-
Edit Own - User can modify content they created but not those created by others.
-
Comments Only - User can add comments but cannot modify content.
-
Read Only - User can only view content without making changes.
-
No Access - User cannot view or interact with the content.
Groups
Managing Groups
To manage user groups:
-
Navigate to User Administration and click Groups.
-
View and manage existing groups or create new ones.
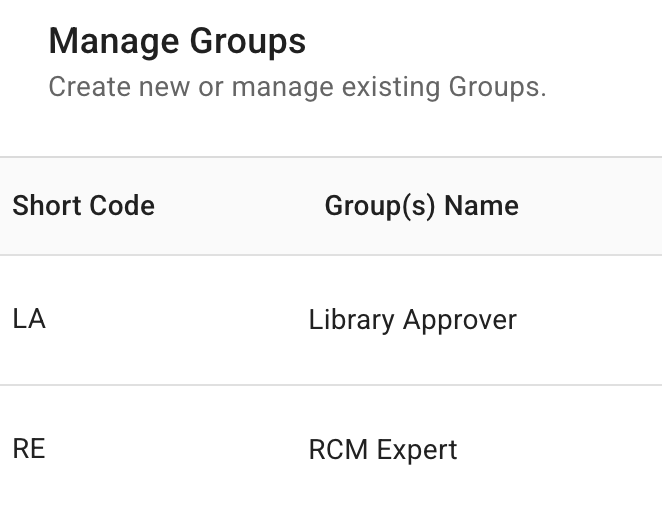
Recommended user groups:
|
Short Code |
Group Name |
Purpose |
|---|---|---|
|
RE |
RCM Expert |
Processes regulatory change alerts and conducts impact assessment. |
|
RM |
RCM Manager |
Manages regulatory change management process. |
|
LE |
Library Editor |
Requests changes to Law Library. |
|
LA |
Library Approver |
Approves changes to Law Library. |
|
LR |
Legal Research |
Conducts regulatory research using Reggi and other tools. |
|
GU |
General User |
Default user for all other purposes. |
In addition, groups can be created based on functional divisions within your company.
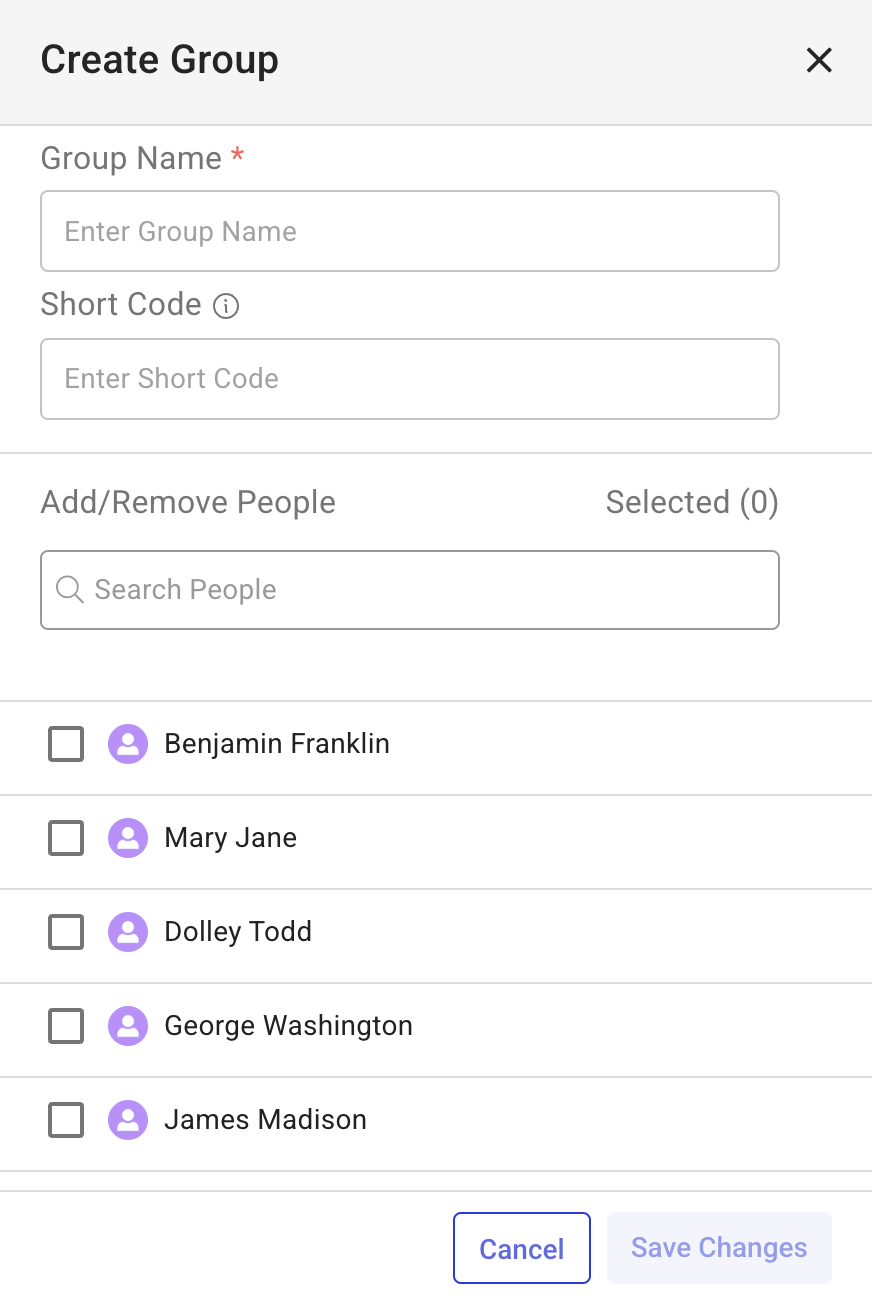
Creating a Group
-
Click New Group in the top-right corner of the page.
-
Enter a Group Name.
-
Use the Add/Remove People field to select users for the group.
-
Click Save Changes to confirm, or Cancel to discard.
Editing a Group
-
Find the group you want to edit.
-
Click the Edit icon (pencil) next to the group name.
-
In the Edit Group window:

-
Update Group Name or Short Code if needed.
-
Use the Search a user bar to add or remove members.
-
Check or uncheck users to adjust membership.
4. Click Save Changes to confirm or Cancel to discard.