Building and Managing a RegArea
Managing Authoritative Documents Associated with RegAreas
Associating Authoritative Documents with RegAreas
The new RegArea is only a placeholder, and you must identify the Authoritative Documents that you want to associate with it. Even as you add Authoritative Documents to your RegArea, associated risks and controls get listed, if they are associated with the Authoritative Documents that you selected.
To add Authoritative Documents to your RegArea:
Open the RegArea and click the Edit List button on the right side of the page.
Search and add Authoritative Documents to your RegArea using the Edit List section that appears. Click the Authoritative Document added to your RegArea to view it.
If there are risks and controls associated with the Authoritative Documents that you added, these get automatically added to the Risks and Controls tiles, respectively.
Editing Authoritative Documents Associated with RegAreas
To edit the list of Authoritative Documents associated with a RegArea:
Open the page associated with the RegArea. The RegArea page appears, displaying the Authoritative Documents associated with it.
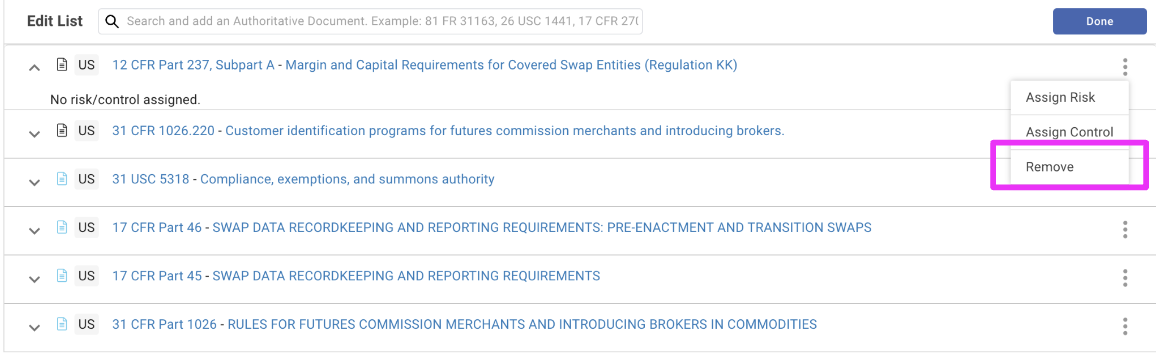
Click Edit List above the list of Associated Documents. The Edit List section appears. Use this section to remove or hide Authoritative Documents associated with the RegArea, or to edit details of existing Authoritative Documents.
Click the Ellipsis icon adjacent to the Authoritative Document that you want to edit, and choose the appropriate operation from the options that appear:
Assign Risks
Assign Controls
Remove
Note: You can associate policies only with RegAreas, not Authoritative Documents.
Assigning Risks to an Authoritative Document
Regology enables you to assign risks to a RegArea, as well as to Authoritative Documents associated with it. To assign a risk:
Open the page associated with the RegArea.
Click the Authoritative Documents tile to display the existing lists of risks associated with the RegArea.
Click Edit List. The Edit List section appears, listing out all the Authoritative Documents associated with the RegArea.
Click the ellipsis adjacent to the Authoritative Document to which you want to assign risks. Select Assign Risk. The Add Risk modal appears.

Use the Select Risk field to search and assign a risk to the Authoritative Document.
Optionally, use the Select Control field that appears when you select a risk, to assign controls for the risk that you just associated with the Authoritative Document.
Click Save.
You can add only one risk and associated control at a time using the Add Risk modal.
Assigning Controls to an Authoritative Document
Regology enables you to assign controls to a RegArea, as well as to Authoritative Documents associated with it.
To assign controls to an Authoritative Document:
Open the page associated with the RegArea.
Click the Authoritative Documents tile to display the existing lists of risks associated with the RegArea.
Click Edit List. The Edit List section appears, listing out all the Authoritative Documents associated with the RegArea.
Click the ellipsis adjacent to the Authoritative Document to which you want to assign risks. Select Assign Controls. The Add Control modal appears.
Use the Select Control field to search and select the control that you need to assign to the Authoritative Document.
Click Save.
Removing Authoritative Documents from a RegArea
To remove an Authoritative Document from a RegArea, click the ellipsis adjacent to that document and select Remove. Click Yes in the warning message that appears.
Managing Risks Associated with a RegArea
Assigning Risks and (Optionally) Controls to a RegArea
To assign risks to a RegArea:
Open the page associated with the RegArea.
Click the Risks tile to display the existing list of risks associated with the RegArea.

Click Add New. The Create Risk > Create Control modal appears.
This modal offers two ways in which you can assign a risk to a RegArea: You can either use an existing risk, or you can create a new one.
To select an existing risk:
Click the Select an Existing Risk button in the top-right section of the modal.
Use the Assign Risk modal that appears to search for existing risks and associate it with the RegArea.
To create a new risk:
Enter a Risk Name and provide a Risk Description.
Enter the Penalty amount that’s associated with compliance failure.
If the risk includes Criminal Charges, switch on the toggle provided.
Expand the Defaults Copied from Authoritative Document section to view the list of users who own the RegArea, and who will also own this risk once you save it.
Click Clear All to remove the default owners from the risk, or leave this section unchanged to ensure that RegArea owners inherit this risk as well.
Click Save to create the risk without creating associated controls.
Click Create Control to add controls to the risk.
Specify a Control Name and Description.
Expand the Defaults Copied from Authoritative Document section to view the list of users who own the RegArea, and who will also own this risk once you save it.
Click Clear All to remove the default owners from the risk, or leave this section unchanged to ensure that RegArea owners inherit this risk as well.
Note: You can add new owners to the control by editing the control after you save it, or later on by clicking the name of the control in the RegArea or Controls page.
Click Save to create the control.
A modal appears, where you must specify whether you want to navigate to the control you created, so you can start work on it, or whether you would like to return to the RegAreas page, so you can resume work on associated Authoritative Documents, risks, and so on.
Click Yes to navigate to the control you just created, or click Cancel to return to the RegAreas page. For guidance on working with the control, see Controls.
Editing the List of Risks Associated with a RegArea
To edit the list of risks associated with a RegArea:
Open the page associated with the RegArea.
Click the Risks tile to display the existing list of risks associated with the RegArea.
Click Edit List. The Edit List section appears. Use this section to remove or hide risks associated with the RegArea, or to edit details of existing risks.
Hiding Risks Associated with a RegArea
Hide risks associated with a RegArea to retain their association, but to remove them from public display. Thus, users who only have Read access to the RegArea cannot see the associated risk, but users who own the RegArea can continue to work on them as needed.
To hide a risk associated with a RegArea:
Open the page associated with the RegArea.
Click the Risks tile to display the existing lists of risks associated with the RegArea.
Click Edit List. The Edit List section appears, listing out all the risks associated with the RegArea.
Click the Hide button associated with the risk. The risk now appears greyed out, and an Include button appears on hover, in place of the Hide button. When you are ready to redisplay a hidden risk, click the Include button.
Click Done to return to the RegArea > Risks display.
Deleting Risks Associated with a RegArea
To delete a risk associated with a RegArea, click the Delete icon adjacent to it. A warning message appears, informing you that this action cannot be undone. Click Yes to confirm the deletion.
Click Done to return to the RegArea > Risks display.
Deleting a risk from a RegArea does not delete the risk from Regology; it only removes the association between the risk and the RegArea, and the risk itself remains available to be reused with other RegAreas, Authoritative Documents, controls, and so on.
Editing Risk Details
To edit the details of a risk associated with a RegArea, click the name of the risk. For details on managing risk details, see Working with Risks.
Managing Controls Associated with a RegArea
Adding Controls to a RegArea
To add a control to a RegArea:
Open the page associated with the RegArea.
Click the Controls tile to display the existing lists of controls associated with the RegArea.
Click Add New. The Create Control modal appears.
Enter a Control Name and Control Description in the fields provided.
Expand the Defaults Copied from Authoritative Document section to view the list of users who own the RegArea, and who will also own this control once you save it.
Click Clear All to remove the default owners from the control, or leave this section unchanged to ensure that RegArea owners inherit this control as well.
Note: You can add new owners to the control by editing the control after you save it, or later on by clicking the name of the control in the RegArea or Controls page.
Click Save to create the control.
A modal appears, where you must specify whether you want to navigate to the control you created, so you can start work on it, or whether you would like to return to the RegAreas page, so you can resume work on associated Authoritative Documents, risks, and so on.
Click Yes to navigate to the control you just created, or click Cancel to return to the RegAreas page. For guidance on working with the control, see Controls.
Editing the List of Controls Associated with a RegArea
To edit the list of controls associated with a RegArea:
Open the page associated with the RegArea.
Click the Controls tile to display the existing list of controls associated with the RegArea.
Click Edit List. The Edit List section appears. Use this section to remove or hide controls associated with the RegArea, or to edit details of existing controls.
Hiding Controls Associated with a RegArea
Hide controls associated with a RegArea to retain their association, but to remove them from public display. Thus, users who only have Read access to the RegArea cannot see the associated control, but users who own the RegArea can continue to work on them as needed.
To hide a control associated with a RegArea:
Open the page associated with the RegArea.
Click the Controls tile to display the existing lists of controls associated with the RegArea.
Click Edit List. The Edit List section appears, listing out all the controls associated with the RegArea.
Click the Hide button associated with the risk. The control now appears greyed out, and an Include button appears on hover, in place of the Hide button. When you are ready to redisplay a hidden control, click the Include button.
Click Done to return to the RegArea > Controls display.
Deleting Controls Associated with a RegArea
To delete a control associated with a RegArea, click the Delete icon adjacent to it. A warning message appears, informing you that this action cannot be undone. Click Yes to confirm the deletion.
Click Done to return to the RegArea > Controls display.
Deleting a control from a RegArea does not delete the control from Regology; it only removes the association between the control and the RegArea, and the control itself remains available to be reused with other RegAreas, Authoritative Documents, risks, and so on.
Editing Control Details
To edit the details of a control associated with a RegArea, click the name of the control. For details on editing a control, see Working with Controls.
Managing Policies Associated with RegAreas
Associating Policies with RegAreas
Associating a New Policy with a RegArea
To associate a new policy with your RegArea:
Open the page associated with the RegArea.
Click the Policies tile to display the existing lists of policies associated with the RegArea.
Click Add New. The Upload Policy modal appears.
Enter the Title of the new Policy in the field provided.
Use the Owner field to search and select users who will own this policy.
Enter a Description of the policy using the field provided.
Enter the Effective Date and the Updated Date of the policy.
Either enter the Document URL to the policy, or if you have the PDF version of the policy, drag and drop the policy document in the field provided.
Click the Add Applicability expandable section to search and select areas where this policy is applicable.
Enter notes on the policy in the Revision Highlights field.
Enter the Approval Date of the policy and select the Ownership Group that owns this policy.
Click to select the Document Type of this policy.
Enter a Document ID for the policy.
Click Save.
The new policy is now associated with the RegArea, and the RegArea page appears, updated with the new policy.
Associating an Existing Policy with a RegArea
To associate an existing policy with your RegArea:
Open the page associated with the RegArea.
Click the Policies tile to display the existing lists of policies associated with the RegArea.
Click Add New. The Upload Policy modal appears.
Click the Select an existing policy button in the top-right corner of the modal.
Use the Search existing documents field to search and select existing policy documents that you need to associate with the RegArea. When you select a policy document, a check mark appears on the right end of the row representing the document.
Click Save.
The existing policy document is now associated with the RegArea, and the RegArea page appears, updated with the new policy.
Editing Policies Associated with RegAreas
To edit the list of policies associated with a RegArea:
Open the page associated with the RegArea.
Click the Policies tile to display the existing list of policies associated with the RegArea.
Click Edit List. The Edit List section appears. Use this section to remove or hide policies associated with the RegArea, update policy owners, or to edit details of existing controls.
Hiding Policies Associated with a RegArea
Hide policies associated with a RegArea to retain their association, but to remove them from public display. Thus, users who only have Read access to the RegArea cannot see the associated policy, but users who own the RegArea can continue to work on them as needed.
To hide a policy associated with a RegArea:
Open the page associated with the RegArea.
Click the Policies tile to display the existing lists of policies associated with the RegArea.
Click Edit List. The Edit List section appears, listing out all the policies associated with the RegArea.
Click the Hide button associated with the policy. The policy now appears greyed out, and an Include button appears on hover, in place of the Hide button. When you are ready to redisplay a hidden policy, click the Include button.
Click Done to return to the RegArea > Policies display.
Deleting Policies Associated with a RegArea
To delete a policy associated with a RegArea, click the Delete icon adjacent to it. A warning message appears, informing you that this action cannot be undone. Click Yes to confirm the deletion.
Click Done to return to the RegArea > Policies display.
Deleting a policy from a RegArea does not delete the policy from Regology; it only removes the association between the policy and the RegArea, and the policy itself remains available to be reused with other RegAreas.
Editing Policy Details
To edit the details of a policy associated with a RegArea, click the name of the policy. The policy details appear. For guidance on working with these fields, see Editing a Policy.
Downloading Control Assessments of RegAreas
Once you have set up a RegArea, you can view an automated assessment of your organization’s compliance with a RegArea.
Navigate to the RegAreas main page.
Click the Ellipsis icon in the top-right corner of the RegArea whose compliance you want to check.
Select Download Control Assessment.
The application generates a Word document that lists out the number of controls applicable to your RegArea along with estimated coverage percentage. For each control, the document provides:
The control ID
The name of the control
The name of the owner of the control
The results of the control effectiveness test
The operating effectiveness rating derived from the control effectiveness test
Filtering RegAreas
The RegAreas page lists out all the RegAreas to which you have access. Use the Filters button to view RegAreas that fulfill specific criteria.
Click the Filters button in the top-right section of the RegAreas page to view the list of filtering options available.
Regology enables you to filter RegAreas by:
Owner
Status
Applicability
Filtering RegAreas by Owner
To filter RegAreas by owner, expand the Owner section and use the Search Users/Groups field to search and select owners.

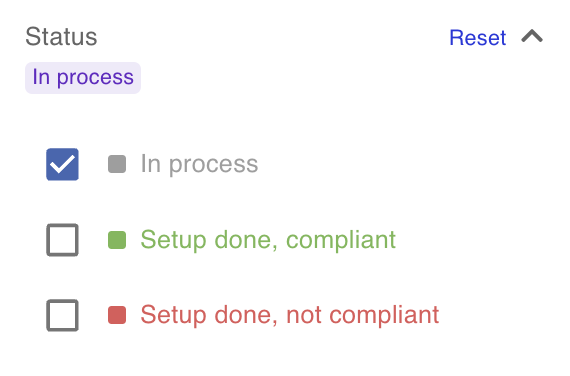
Filtering RegAreas by Status
To filter RegAreas by status, expand the Status section and select the checkboxes adjacent to the statuses that you want to use to filter the RegAreas in the page.
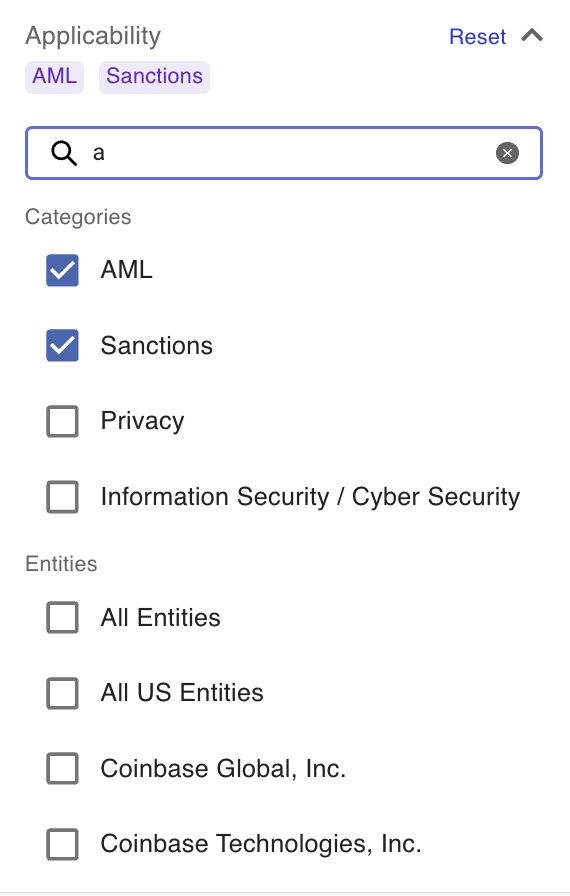
Filtering RegAreas by Applicability
To filter RegAreas by applicable regulations, expand the Applicability section and use the Search Applicability field to search and select regulations to which the RegAreas in the page must be applicable.
Creating Saved Views for RegAreas
Use filters to list out RegAreas that are of interest to you. Save this set of filters as a saved view, so you can quickly return to this view when you revisit the RegAreas page.
To create a saved view:
Use filters to list out RegAreas that are of interest to you.
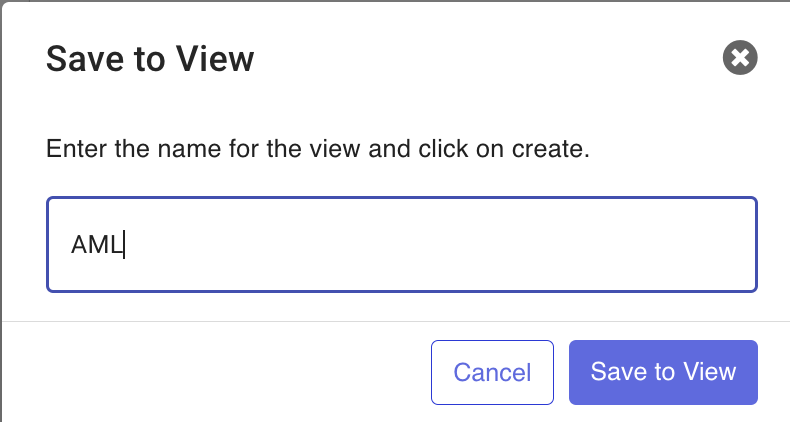
Click the Save to View button that appears adjacent to the Filters button.
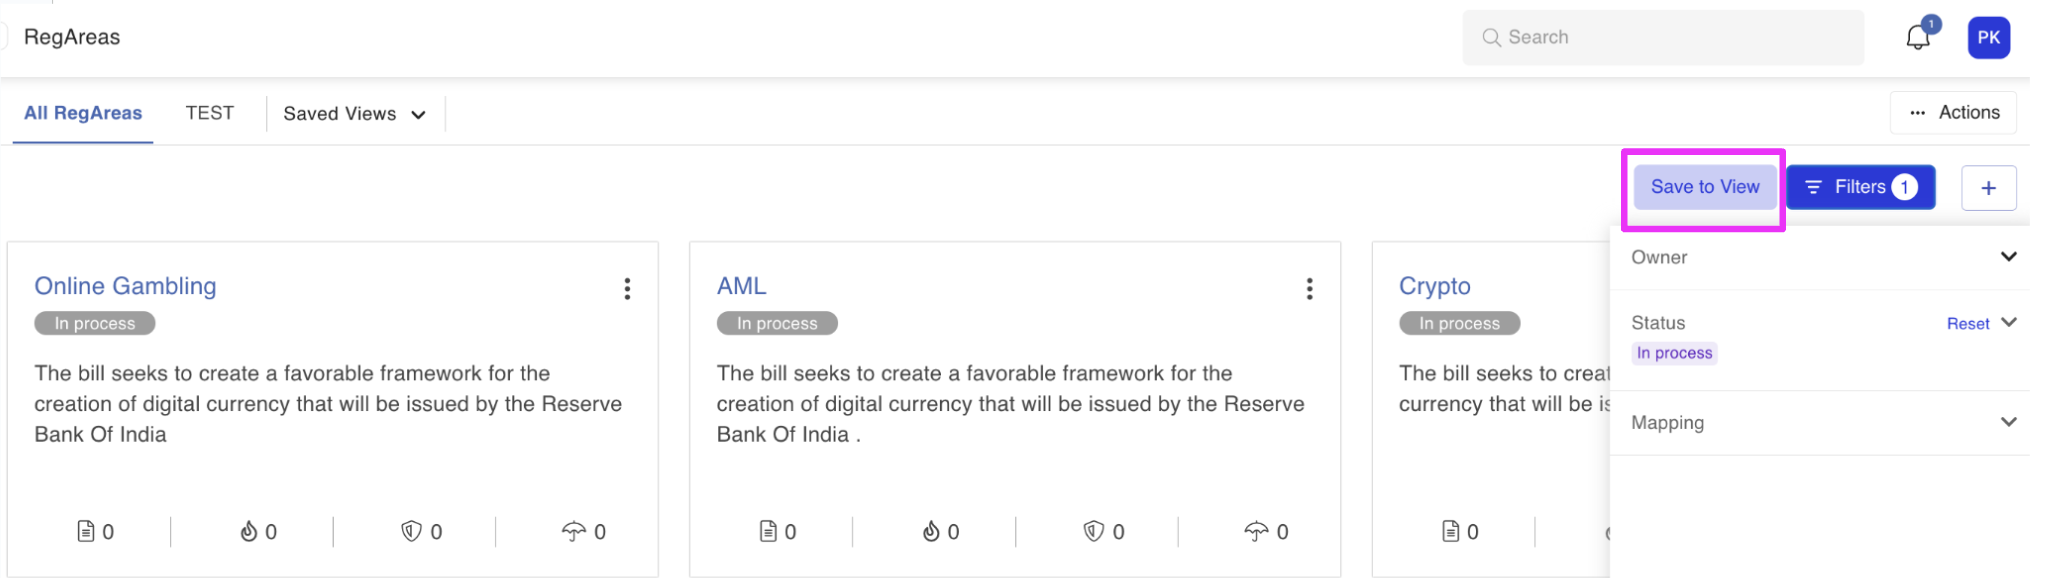
Give your saved view a name using the Save to View modal that appears.
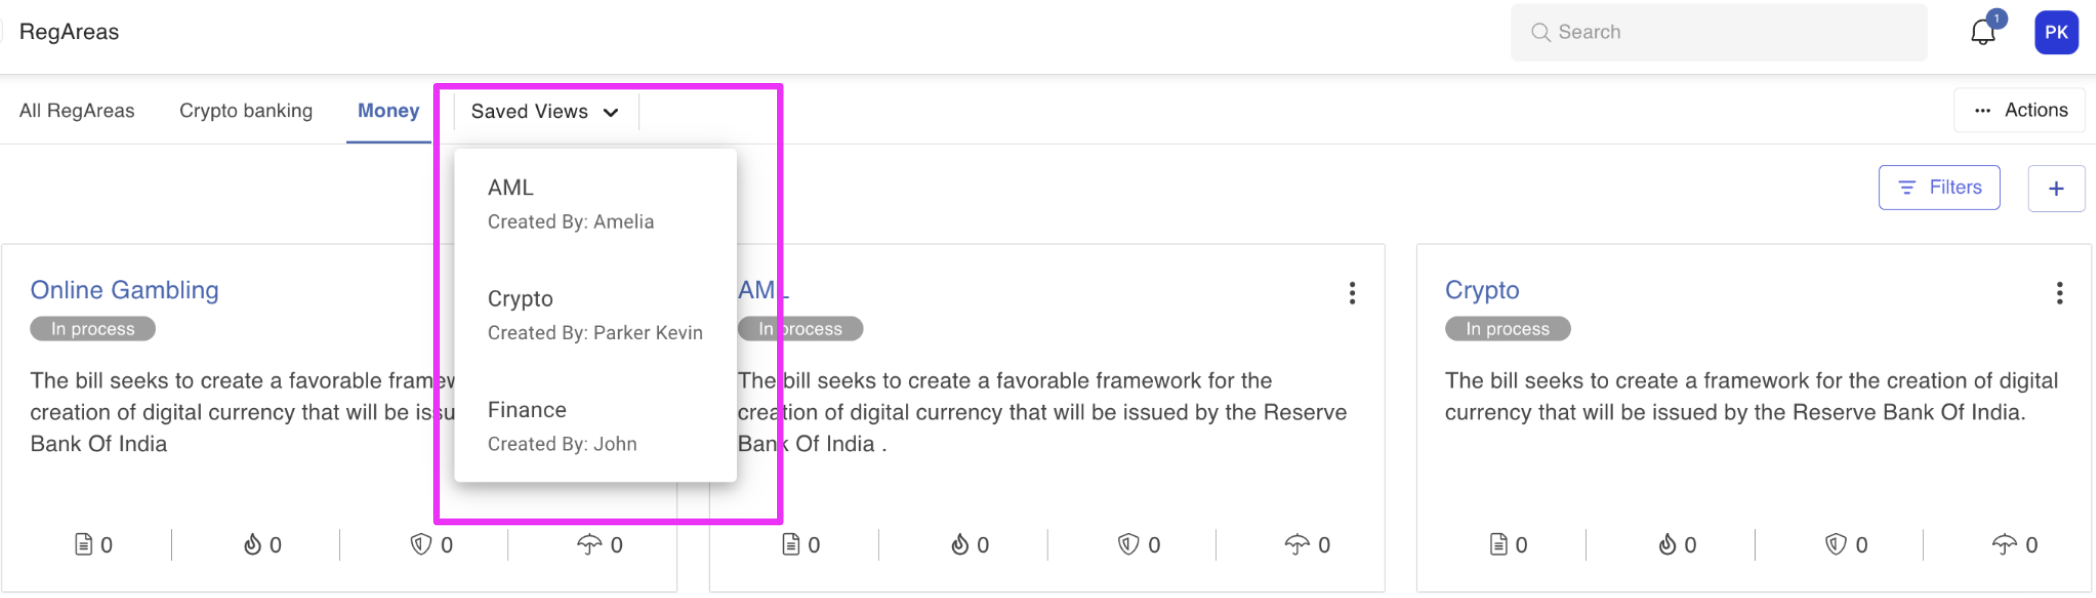
The saved view now appears as a separate tab in the RegAreas page.
When you navigate away from the page and return to it later, use the Saved Views drop-down list to select your saved view and reopen the filtered list as a new tab.
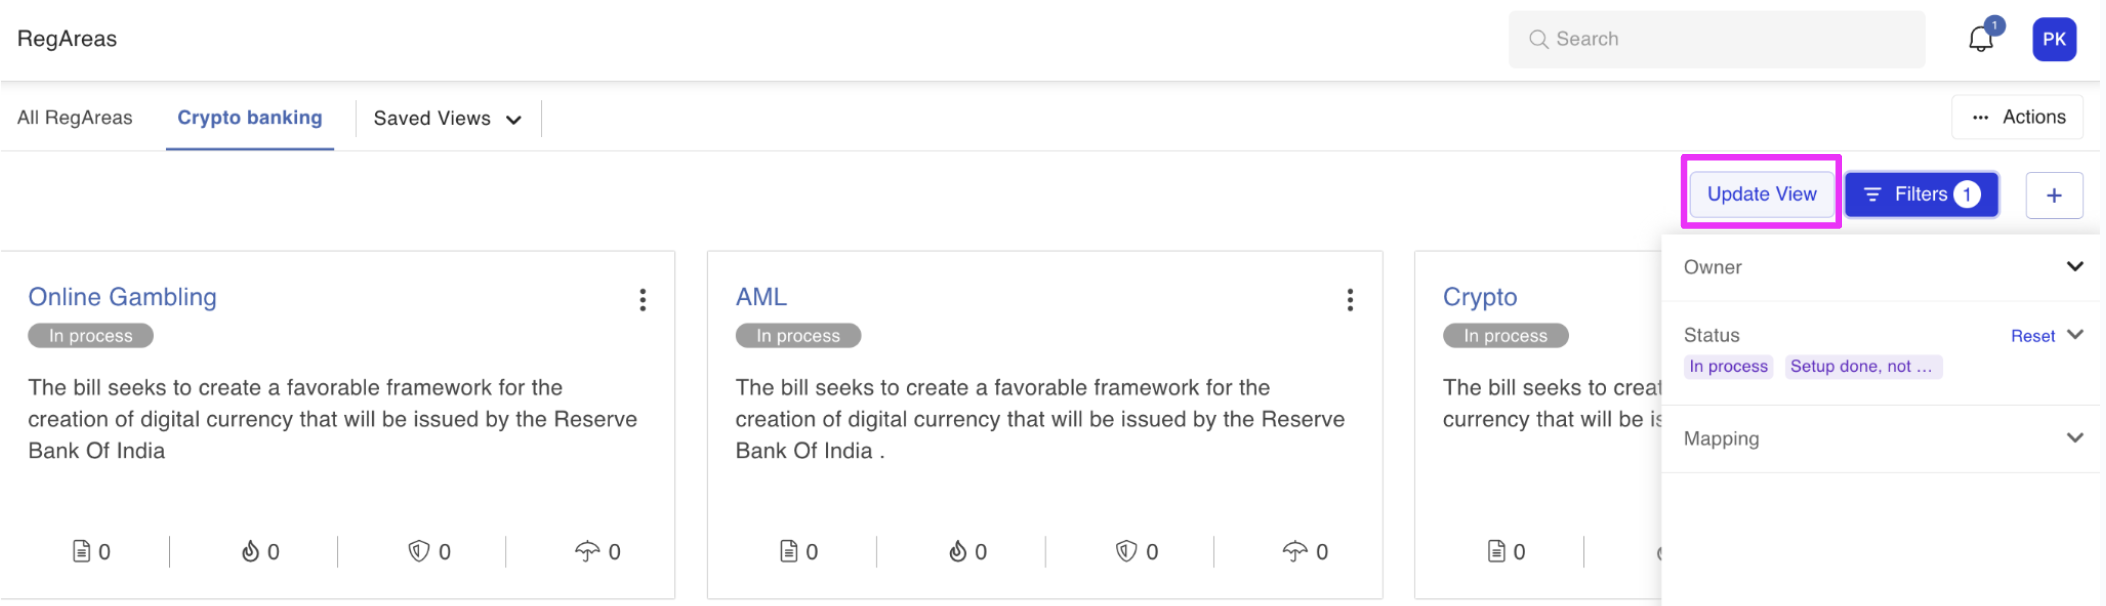
Updating Saved Views
When you open a saved view, it displays in a separate tab. You can, however, update the filters associated with the saved view as required. To do so, use the Filters button to view and update your filters, and then click the Update View button that appears.
Working with Saved Views
You can perform a range of tasks using your saved views. To view these, click the Action button that appears on the right side of the saved view. A drop-down menu appears, listing the following options:
Pin/Unpin: Use this option to pin and unpin the saved view as a tab at the top of the platform. You can pin a maximum of four saved views.
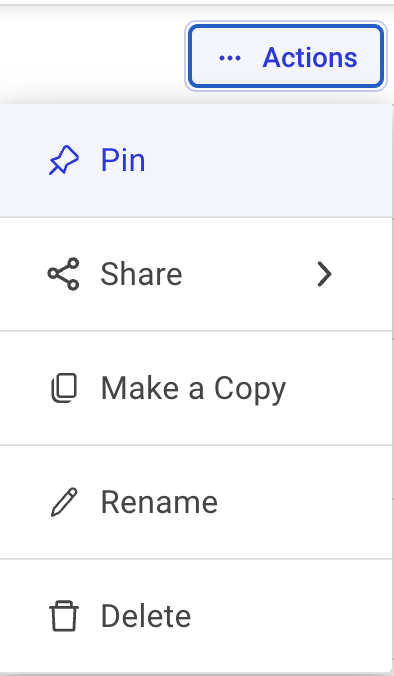
Share: This option enables you to share the saved view with other users.
Enter the name of the users with whom you want to share the view, and choose their access level (Editor or Viewer).
Note: Users with Editor access can add other users who can view and edit your saved view.
Click on the Share button to share the view.
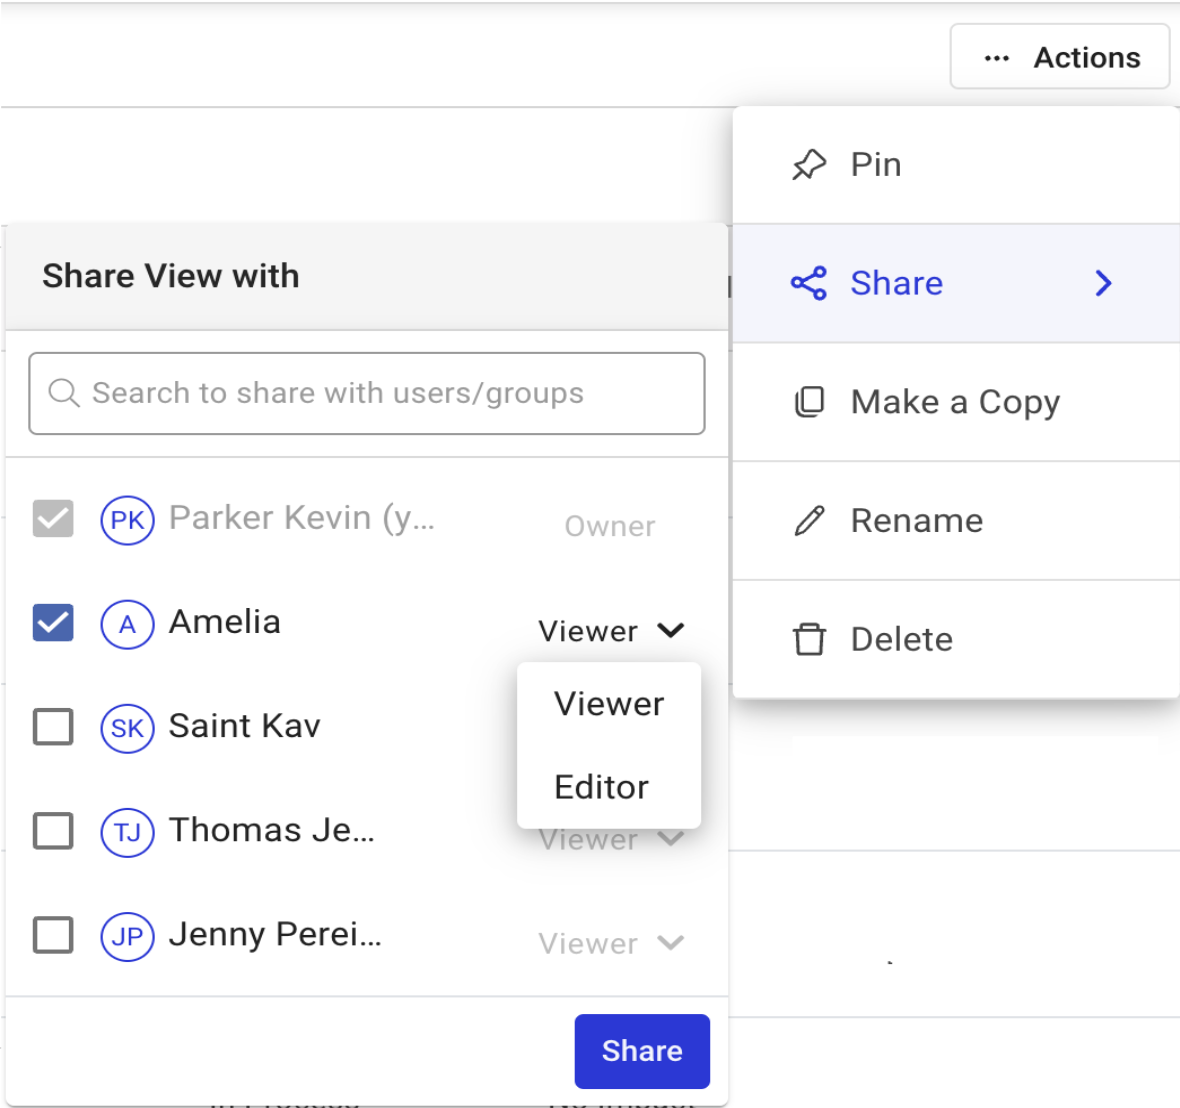
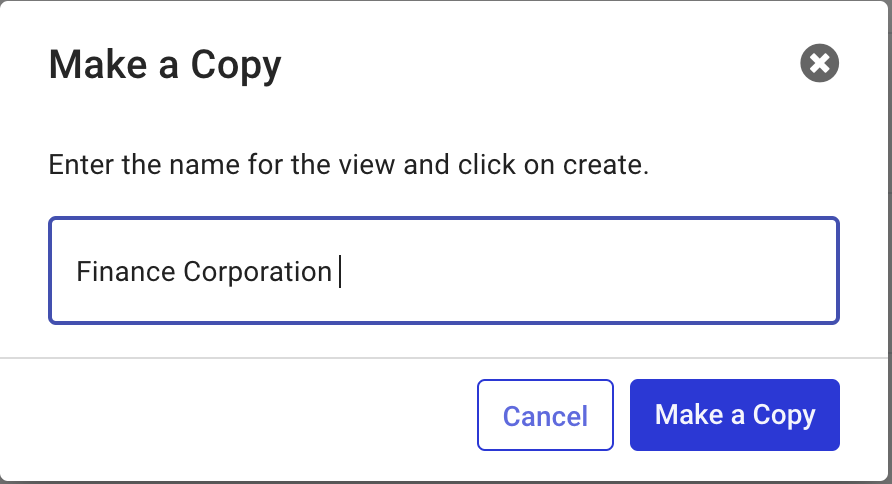
Make a Copy: Use this option to make a copy of the saved view with a new name.
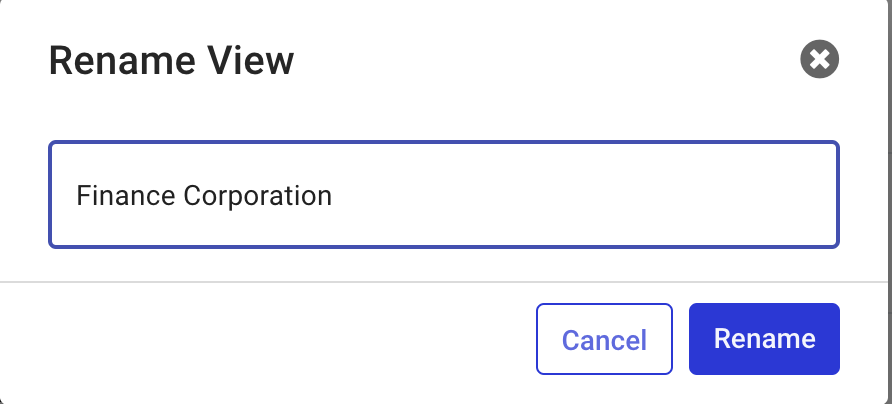
Rename: This option allows you to rename the saved view.
Delete: This option allows you to delete the saved view.