Overview
The Law Library Review & Approval Workflow streamlines document management by defining clear roles, permissions, and a structured approval process. It provides a centralized system for requesting, tracking, and approving changes, ensuring accuracy, accountability, and smoother onboarding.
Key Features and Roles
What Seeks Approval?
-
Adding a Document to the Law Library
-
Making Changes to Documents in the Law Library (e.g., Status, Owners, Mappings)
User Roles and Permissions
Editor
-
Access to "Sent for Review" and "My Documents" tabs.
-
Can:
-
Request to add documents to the Law Library.
-
Request changes (Status, Owners, Mappings) to documents.
-
Revoke change requests if corrections are needed.
-
Approver
-
Access to "Needs Approval" and "My Documents" tabs.
-
Can:
-
Add documents to the Law Library.
-
Approve/reject changes requested by Editors.
-
Make changes directly to documents (Status, Owners, Mappings).
-
Perform bulk approval/rejection.
-
Other Users/General Users
-
Access to "My Documents" tab.
-
Can view documents
Feature Activation & Configuration
-
Administrators can enable the workflow via Admin > Application Configuration > Law Library by selecting the Activate Law Library Approval Workflow checkbox.
-
Once enabled, dedicated Approver and Editor user groups are created for role-based access control. Administrators must add users to these groups to assign appropriate roles and permissions.
1. User Flows For Editors
1.1 Request to Add a Document to the Law Library
Step-by-Step Instructions:
-
Open the Document
-
Navigate to the document you want to add and open its detailed view.
-
-
Access the Add to Library Panel
-
Locate and expand the right-side panel of the document interface.
-
You should see the "Add to Library" button prominently displayed.
-
-
Click on Add to Library
-
This will launch a guided workflow for adding the document.
-
-
Select the Document Level
-
Review the available document levels.
-
Select the appropriate level based on the context or hierarchy of the document.
-
A "Recommended" tag may highlight the most relevant option.
-
-
Assign Workflow Status
-
Choose a workflow status that aligns with the document’s current stage (e.g., Applicable, implemented; Applicable, not implemented).
-
If unsure, refer to organizational guidelines or consult your Approver.
-
-
Map Topics
-
Use the topic mapping feature to categorize the document.
-
Choose from pre-defined topics or search for relevant terms.
-
-
Assign Owners
-
Add Users or Groups as document Owners.
-
Owners will be responsible for maintaining the document and managing future changes.
-
-
Complete and Confirm
-
Review all selections and mappings for accuracy.
-
Click "Send for Review" to send the document for approval.
-
1.2 Check the Status of Changes
Step-by-Step Instructions:
-
Navigate to the "Sent for Review" Tab
-
Locate the "Sent for Review" tab in your dashboard.
-
This tab contains all requests submitted for approval.
-
-
Locate Your Request
-
Use the search bar or filters (e.g., "Status") to find your specific request.
-
-
Review Approval Status
-
Check the status column next to each request.
-
Common statuses include:
-
Awaiting Approval: Indicates that the request is pending review by Approvers.
-
Approved: Confirms that the request has been reviewed and accepted.
-
Rejected: Indicates the request was reviewed but not approved.
-
-
-
View Details of Rejected Requests
-
Hover over the "Rejected" badge to view the reason for rejection.
-
Click on the request to open the detailed view and access additional comments or feedback.
-
-
Monitor Changes in Real-Time
-
Updates to the status of your requests will reflect automatically in the "Sent for Review" tab.
-
1.3 Request Changes to an Existing Document in the Library
Step-by-Step Instructions:
-
Open the Document
-
Navigate to the document you wish to update.
-
Open the document’s detailed view.
-
-
Access the Edit Panel
-
Expand the right-side panel to view editable fields like Status, Owners, or Mappings.
-
-
Make Necessary Changes
-
Update the desired fields, such as:
-
Status: Change the workflow status (e.g., Applicable, not implemented).
-
Owners: Modify the list of assigned Users or Groups responsible for the document.
-
Mappings: Add or update topic mappings.
-
-
-
Review Your Changes
-
Double-check your modifications for accuracy and completeness.
-
-
Click "Send for Review"
-
Submit the changes for approval by clicking the "Send for Review" button.
-
This action will notify Approvers that the changes are pending their review.
-
1.4 Revoke or Resubmit Requests
-
From the "Sent for Review" tab or the document panel, go to requests marked as "Awaiting Approval," you can click the "Revoke Change Request" icon to withdraw the submission.
-
Make necessary adjustments and resubmit the request.
2. User Flows for Approvers
2.1 Add a Document to the Law Library
Step-by-Step Instructions:
Navigate to the Document
-
Go to the document you want to add and open its detailed view.
Expand the Right-Side Panel
-
Look for the right-side panel in the document interface.
-
Click to expand it to view more options.
Click "Add to Library"
-
In the expanded panel, click the "Add to Library" button.
-
This will begin the workflow for adding the document to the law library.
Assign Status
-
Select the appropriate status for the document, such as "Applicable, not implemented," etc.
-
Ensure the status aligns with the document’s current stage.
Map Topics
-
Review the topics mapped to the document.
-
You may need to update or verify the topics by selecting from pre-defined categories or searching for relevant terms.
Assign Owners
-
Assign owners to the document. Owners are responsible for maintaining and updating the document as needed.
Confirm and Approve
-
Review the selections made (status, topics, owners).
-
After confirming the details, click "Finish Adding" to send the document for review and approval.
2.2 Approve or Reject Changes
Step-by-Step Instructions:
-
Open the "Needs Approval" Tab
-
Navigate to the "Needs Approval" tab on your dashboard.
-
This tab contains all requests awaiting your review.
-
-
Select a Request
-
Browse through the list of pending approval requests.
-
Click on a request to open the detailed view of the document.
-
-
Analyze the Change Request
-
Review the proposed changes, such as updated mappings, owners, or status modifications.
-
-
Approve or Reject the Request
-
Approve: Click the green tick icon. This will implement the changes and notify the Editor.
-
Reject: Click the red cross icon. Provide a reason for rejection in the pop-up text box before submitting.
-
-
Confirm Action
-
Your decision will be recorded, and the Editor will be notified of the outcome.
-
Approved changes are applied immediately to the document.
-
Capture and View Approval Reason
When approving a request, Approvers are prompted to enter an Approval Reason.
-
Clicking the Approve (checkbox) icon opens a dialog box requiring the Approver to enter an approval reason.
-
The approval reason is mandatory before confirming the action.
-
Once approved:
-
A visible Approved label appears in the Actions column.
-
Hovering over the Approved label displays the entered approval reason in a tooltip.
-
-
Approval reasons are visible when the Show Approved filter is enabled in the Needs Approval view.
Conflict Cases: Parent and Child Documents
In scenarios where both parent and child Authority Documents (ADs) are sent for approval:
-
Approvers can:
-
Select all ADs at once and approve them together, or
-
Select individual ADs and approve them separately.
-
Approval Reason Behavior:
-
When approving multiple ADs at once:
-
A single Approval Reason can be entered.
-
The reason will apply to all selected ADs.
-
-
When approving an individual AD:
-
The same Approval Reason dialog box appears for that specific AD.
-
Once approved, the reason is displayed on hover over the Approved label in the Actions column (when Show Approved is enabled).
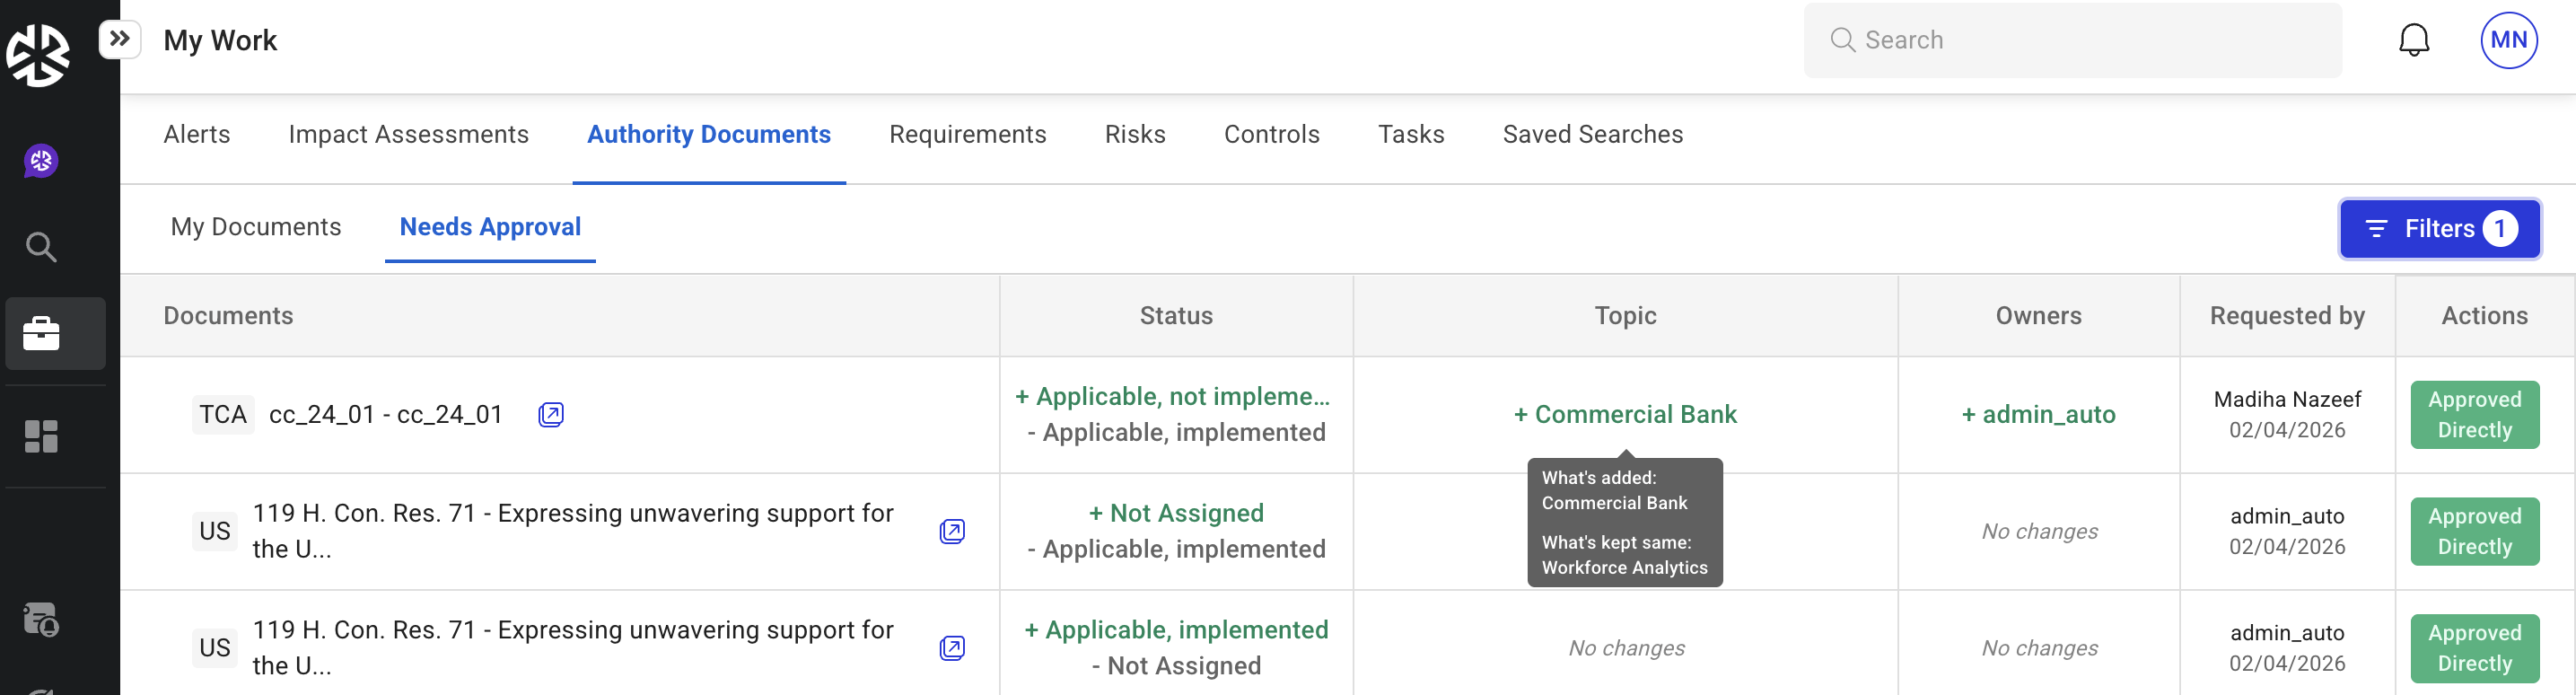
Analyze the Change Request
When reviewing a request in the Law Library Approval table, both the original values and the updated (delta) values are presented for key fields such as Topics and Owners.
For each field, the changes are clearly categorized to provide complete visibility into what has been modified:
-
What’s Added – Displays newly added values
-
What’s Removed – Displays values that have been removed
-
What’s Kept Same – Displays values that remain unchanged
If no updates have been made to a particular field, the table displays No Changes. Hovering over No Changes reveals the list of values that remain unchanged under What’s Kept Same.
This structured presentation enables Approvers to evaluate the full context of a request and understand the precise impact of the proposed changes before taking action.
Export Law Library Change Requests
From the Needs Approval saved view, Law Library change requests can be exported for record-keeping and reporting purposes.
Export Includes:
-
Both Approved and Rejected requests
-
All visible columns (including delta values)
-
The final action taken (Approved or Rejected)
-
The state relevant to that action (i.e., the version that was approved or rejected)
2.3 Make Changes to a Document
Step-by-Step Instructions:
-
Open the Document
-
Navigate to the "My Documents" tab or the "Needs Approval" tab (if the document is part of a change request).
-
Locate the document you want to modify and click on it to open its detailed view.
-
-
Access the Edit Panel
-
On the document detail page, expand the right-side panel.
-
-
Identify Editable Fields
-
Look for fields that can be updated, such as:
-
Status: Modify the workflow stage.
-
Owners: Update the assigned Users or Groups responsible for the document.
-
Mappings: Adjust topic mappings to better categorize the document.
-
-
-
Make the Necessary Changes
-
Edit Status:
-
Click on the "Status" field to view the dropdown options.
-
Select the appropriate status for the document.
-
-
Update Owners:
-
Use the search bar to find and add new Users or Groups.
-
Remove outdated Owners if necessary.
-
-
Update Mappings:
-
Search for relevant topics and add or remove them as needed.
-
Review existing mappings to ensure they align with the document’s content.
-
-
-
Click "Save Changes"
-
Once all updates are made, click the "Save Changes" button.
-
A confirmation message will appear to indicate that the changes have been successfully applied.
-
-
Annotate Changes (Optional)
-
If the changes impact other users (e.g., Editors or other Approvers), consider leaving a note in the comments section to explain the updates.
-
This ensures transparency and keeps the team informed.
-
Visibility into Auto-Approved Direct Changes
When Approvers or Editors make direct updates that do not require manual review:
-
These changes now appear in the Law Library requests list as Approved entries.
-
Such entries are labeled:
-
Approved Directly
-
-
Hovering over the label displays a tooltip indicating:
-
Auto-approved by [User Name]
-
Key Notes:
-
Auto-approved entries remain visible for transparency and audit tracking.
-
They do not require further action unless modified again.
Approve Update Action for Modified Auto-Approved Entries
If an auto-approved entry is later updated (e.g., changes to Status, Owners, or Applicability):
-
Approvers will see a new action button labeled Approve Update.
-
This allows the Approver to review and confirm the new modification.
3. User Flows for General Users
3.1 Viewing Documents not in Law Library
If you are a General User looking to access a document that is not part of the Law Library, you might encounter certain limitations or features designed to guide your actions. Follow these steps to understand how such documents are presented and how to interact with them.
Navigate to the Document
-
Use the search bar or browse through your assigned documents under the "My Documents" tab.
-
Locate the document you are trying to access.
Open the Document
-
Click on the document to view its details.
Identify Restricted Features
-
You can view the document's details but cannot perform actions reserved for Law Library documents.
-
Features like Workflow Status, Owners, Mappings, Assign Risks, Assign Controls are unavailable for non-library documents.
Check Document Context (if provided)
-
Non-Library documents might still have limited metadata, such as versions, technical details.
-
This information can help you determine its relevance or next steps.
Review Notes or Comments
-
If applicable, look for comments or notes added by Editors or Approvers indicating why the document is not yet in the Library or whether it is under review.
Request Action (if Necessary)
-
If you need the document to be added to the Library, contact an Editor or Approver within your organization.
-
Provide them with details on why the document should be reviewed for inclusion.
-
Editors or Approvers may follow up on your feedback or requests to assess the document for addition to the Library.
3.2 Viewing Documents in Law Library
When interacting with the platform as a General User, documents that are included in the Law Library are distinguishable by specific features and functionalities. Here’s a detailed guide on how such documents appear and what you can do with them.
Access the Platform
-
Log in to your account on the platform.
-
Navigate to the "My Documents" tab or use the search bar to locate documents.
Locate Law Library Documents
-
Documents included in the Law Library are marked with a distinct label, such as "In Library".
Open the Document
-
Click on a document in the list to view its detailed interface.
Recognize Enhanced Features
-
Law Library documents typically have expanded options and metadata fields. Commonly visible elements include:
-
Workflow Status (e.g., Applicable, not implemented etc.)
-
Owners (assigned Users or Groups responsible for the document)
-
Mappings (topics or categories assigned to the document)
-
Review Status and Ownership
-
Look for fields like Workflow Status to understand the document's current stage.
-
Owners are listed to indicate who is responsible for maintaining the document.
Collaborate via Comments or Reviews
-
Use the comments or notes section (if available) to provide feedback, share insights, or raise queries about the document.
-
Comments will notify the responsible Owners or Editors.
3.3 General User Documents in My Work > My Documents
As a General User, when you navigate to the My Work > My Documents tab, you will see all documents that are assigned to you or your team/group.
Key Features Available in My Documents:
-
Document List: Displays all the documents you or your team are responsible for.
-
Actionable Insights:
-
View document details and summaries.
-
Open and navigate to a specific document for review or editing.
-
-
Access to Fields: You can modify most fields except those restricted by role permissions (Status, Owners, Mappings).
Note: This feature is optional and must be enabled by an administrator.